バーチャルホスト設定を有効にすれば、ドメイン毎にディレクトリを分けてWordPressなどをインストールできるので、新しい案件に着手する度に、以前のサイトを削除しなければならないといった手間が省けます。
今回はXAMPPのバーチャルホスト設定を有効にして、複数のディレクトリにサイトを構築する方法をご紹介します。
このページのコンテンツ
バーチャルホストの設定方法
XAMPPのバーチャルホスト設定で複数ドメインに対応させるには、XAMPP自体の設定以外にWindows側の設定も必要です。
XAMPPの設定
httpd.confの設定
以下のディレクトリにあるhttpd.confを開いて、520行目付近にある以下の項目の先頭に「#」が無いことを確認します。
■httpd.confの場所
C:¥xampp¥apache¥conf¥httpd.conf
■httpd.conf 520行目
Include conf/extra/httpd-vhosts.conf
「#」がついてる(コメントアウトされている)場合、バーチャルホストの設定ファイルが読み込まれない状態になっていますので#を消してください。
バーチャルホスト設定ファイルの修正
以下のディレクトリにあるhttpd-vhosts.confを開いて、一番下の行に以下の通り記述します。
■httpd-vhosts.confの場所
C:¥xampp¥apache¥conf¥extra¥httpd-vhosts.conf
##<VirtualHost *:80>
    ##ServerAdmin webmaster@dummy-host2.example.com
    ##DocumentRoot "C:/xampp/htdocs/dummy-host2.example.com"
    ##ServerName dummy-host2.example.com
    ##ErrorLog "logs/dummy-host2.example.com-error.log"
    ##CustomLog "logs/dummy-host2.example.com-access.log" common
##</VirtualHost>

#以下を1ホスト分として追記する
<VirtualHost *:80>
DocumentRoot "C:/xampp/htdocs/dummy-host.example.com"
ServerName dummy-host.example.com
</VirtualHost>

<Directory "C:/xampp/htdocs/dummy-host.example.com">
AllowOverride All
Require all granted
</Directory>
上記の場合は「dummy-host.example.com」というURLで「C:\xampp\htdocs」に設置した「dummy-host.example.com」というフォルダにアクセスする場合の書き方です。このフォルダ内に設置したファイルがバーチャルホストのサイトとして表示されます。
Windows側の設定
hostsファイルの編集
XAMPPとしての設定は完了しましたが、このままでブラウザからアクセスできませんので、Windowsのhostsファイルを編集します。hostsファイルは以下のディレクトリにあります。
※hostsファイルはシステムファイルです。編集は自己責任でおこなってください!
C:\Windows\System32\drivers\etc\
なお、hostsファイルは管理者権限でなければ編集・保存できません。管理者権限として編集する方法はここでは割愛します。
# Copyright (c) 1993-2009 Microsoft Corp.
#
# This is a sample HOSTS file used by Microsoft TCP/IP for Windows.
#
# This file contains the mappings of IP addresses to host names. Each
# entry should be kept on an individual line. The IP address should
# be placed in the first column followed by the corresponding host name.
# The IP address and the host name should be separated by at least one
# space.
#
# Additionally, comments (such as these) may be inserted on individual
# lines or following the machine name denoted by a '#' symbol.
#
# For example:
#
#      102.54.94.97     rhino.acme.com          # source server
#       38.25.63.10     x.acme.com              # x client host

# localhost name resolution is handled within DNS itself.
#	127.0.0.1       localhost
#	::1             localhost

#hostsの一番下に以下を追記
127.0.0.1 dummy-host.example.com
XAMPPの再起動
ここまでの設定が終わったらapacheを再起動してください。再起動しないとアクセスできません。
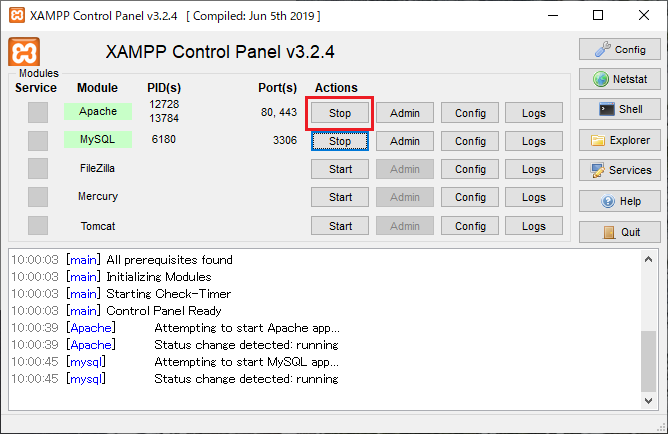
上記で、http://dummy-host.example.comにアクセスするとWEBサイトが表示されるようになります。
バーチャルホスト追加の流れ
別のバーチャルホストを追加したい場合は、上記手順「バーチャルホスト設定ファイルの修正」から同じ作業を繰り返してください。
参考までに、管理人の作業の流れをご紹介します。
ドキュメントルートの設置
管理人はドキュメントルート(各サイト毎のフォルダ)をEドライブに指定し、フィルダ名を「VirtualHost」としていますので、以下のディレクトリに各クライアントのディレクトリを作成します。
E:\VirtualHost\ディレクトリ名
httpd-vhosts.confの編集
作成したディレクト(バーチャルホスト)を設定します。httpd-vhosts.confに以下を追記。
ちなみにアクセスするドメインですが、管理人は以下のルールで設定しています。
- ディレクトリ名は都度任意だがどの顧客かわかる名前にする
- ドメインは「本番ドメイン.localhost」とする
「本番ドメイン.localhost」とするのは、本番サイトにUPする際にDBなどの置換が.localhostの部分だけなので確認しやすい?のと、ドメインでどのクライアントかすぐ判断できるようにするためです。本番ドメインが「example.com」なら「example.localhost」とします。
<VirtualHost *:80>
DocumentRoot "E:\VirtualHost\ディレクトリ名"
ServerName 本番ドメイン.localhost
</VirtualHost>

<Directory "E:\VirtualHost\ディレクトリ名">
AllowOverride All
Require all granted
</Directory>
hostsファイル編集
hostsファイルにローカルループバックアドレス(127.0.0.1)を追記します。
# Copyright (c) 1993-2009 Microsoft Corp.
#
# This is a sample HOSTS file used by Microsoft TCP/IP for Windows.
#
# This file contains the mappings of IP addresses to host names. Each
# entry should be kept on an individual line. The IP address should
# be placed in the first column followed by the corresponding host name.
# The IP address and the host name should be separated by at least one
# space.
#
# Additionally, comments (such as these) may be inserted on individual
# lines or following the machine name denoted by a '#' symbol.
#
# For example:
#
#      102.54.94.97     rhino.acme.com          # source server
#       38.25.63.10     x.acme.com              # x client host

# localhost name resolution is handled within DNS itself.
#	127.0.0.1       localhost
#	::1             localhost

127.0.0.1 dummy-host.example.com
127.0.0.1 本番ドメイン.localhost
apache再起動
apacheを再起動します。
まとめ
ローカルの環境でサーバーサイドでしか動作しない案件の構築には必須のソフトです。ただし、CGI(Perl)を動かすときは多少設定が複雑です。デフォルトでは「/cgi-bin/」ディレクトリでしかCGIは動作しないので、それ以外のディレクトリで動作させるには色々と変更しなければならず、一気に敷居が高くなります。しかしPHPは何の設定もなく動きますので、WordPressやEC-CUBEなどの構築には何の支障もありませんのでご安心ください。
ただ、XAMPP自体によく不具合が起こります。気を付けてれば大丈夫なんですが、XAMPPを正常に終了させないとSQLに接続できなくなったりします。

以上、XAMPPでバーチャルホストを設定して複数ドメインに対応する方法のご紹介でした。

この記事を書いた人管理人
SAKURAGRAPHICA代表
会社員の傍ら、フリーランスでWEBサイトの制作やWordPressによるCMSの構築・障がい者の就労支援としてホームページ制作の職業指導員も行っております。